Themes are objects that control the look and feel of the PyUI interface. They can customize how frames, menus and widgets are drawn and the placement of hotspots of frames. Themes in PyUI are procedural - they allow the look and feel to be customized with code, not just by changing data - which allows PyUI themes a great amount of flexibility.
Changing the Theme
By default in the 0.91 release, PyUI uses the "win2k" theme defined in pyui.theme2k.py. To use a different theme, set the "theme" attribute of the desktop instance to a new theme object before any PyUI windows or frames are created. The other themes that currently ship with PyUI are the "dataTheme" which is in pyui.theme.py and the "greenTheme" which is in pyui.greenTheme.py.
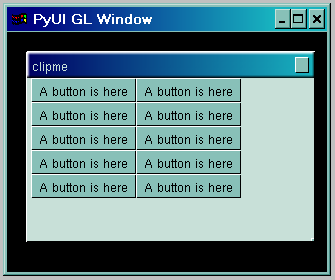
Here are screenshots of the three themes in action:
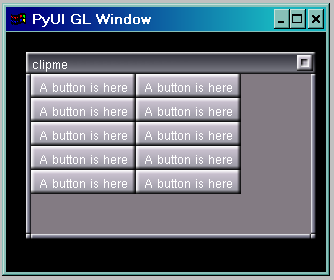
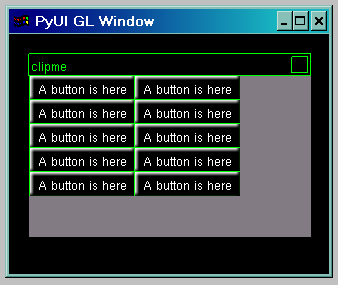
Note that in these screenshots using the GL renderer, these themes effect the drawing of PyUI framed windows within PyUI - not the Operating System drawn frame around the PyUI window itself. In the win32 renderer, the borders of framed PyUI windows are draw by the Operatin System and so are not effected by theming. They conform to the look and feel of the user's desktop. It is specified in the renderer (not the theme) whether the OS will draw window frame borders with the "nativeFrames" flag.
Writing a Theme
To write a theme for PyUI, derive a new class from the base theme class "dataTheme" in theme.py. In your theme you can customize many things including:
The relationship between widgets and themes is that all state information is kept in widgets, and all drawing code is kept in the theme. The theme should not store state information - it should only know how to draw widgets based on the parameters passed to the draw* methods of the theme-derived class.
To customize colors for a theme, assign new values to the color constants defined in dataTheme. The default values are:
     self.fgColor = renderer.packColor(255,255,255)
     self.bgSelect = renderer.packColor(150,160,140)
     self.bgColor1 = renderer.packColor(150,140,150,224)
     self.bgColor2 = renderer.packColor(60,40,50,128)
     self.bgColor3 = renderer.packColor(60,50,50,128)
     self.bgMenuBar = renderer.packColor(60,60,60)
     self.bgMenuPanel = renderer.packColor(60,60,70,224)
     self.bgMenuSelect = renderer.packColor(125,120,120)
     self.black = renderer.packColor(0,0,0)
     self.white = renderer.packColor(255,255,255)
     self.shadeHi0 = renderer.packColor(255,255,255,0)
     self.shadeHi1 = renderer.packColor(255,255,255,255)
     self.shadeLo0 = renderer.packColor(0,0,0,0)
     self.shadeLo1 = renderer.packColor(0,0,0,255)
     self.buttonUpA = renderer.packColor(210,200,215)
     self.buttonUpB = renderer.packColor(150,150,160)
     self.buttonRoA = renderer.packColor(230,240,250)
     self.buttonRoB = renderer.packColor(180,190,200)
     self.buttonDnA = renderer.packColor(100,110,120)
     self.buttonDnB = renderer.packColor(180,180,200)
     self.buttonFocus = renderer.packColor(128,192,255,128)
     self.captionA = renderer.packColor(40,40,50)
     self.captionB = renderer.packColor(130,130,140)
     self.frameColor = renderer.packColor(120,120,140)
     self.shadowLight = renderer.packColor(0,0,0,64)
     self.shadowMedium = renderer.packColor(0,0,0,128)
     self.shadowDark = renderer.packColor(0,0,0,192)
To customize the size of frame borders, assign new values to the frame* constants defined in dataTheme. The defaults are:
        self.frameBorderLeft = 5
        self.frameBorderRight = 5
        self.frameBorderTop = 22
        self.frameBorderBottom = 5
To customize how basic shapes are drawn, override any of the utility drawing methods such as draw3DRect(), shadeBorder(), drawOutlineRect() and drawGradient(). The general drawing methods are:
    def drawText(self, text, position, color)
    def draw3DRect(self, rect, color, reverse)
    def shadeBorder(self, rect, d, reverse)
    def drawOutlineRect(self, rect, color, thick=1)
    def drawImage(self, rect, image)
    def drawRect(self, rect, color)
    def drawGradient(self, rect, vertical, c1, c2)
    def drawBack1(self, rect)
    def drawBack2(self, rect)
    def drawBack3(self, rect)
To customize how indiviual types of widgets are drawn, override the methods for drawing those specific widgets. These methods are called from within pyui.widgets.py when the widgets need to be redrawn and pass enough state information into them each time to completely redraw the type of widget. The widget drawing methods are:
    def drawButton(self, rect, title, hasFocus, status, enabled)
    def drawImageButton(self, rect, filename, title, hasFocus, status)
    def drawLabel(self, rect, title, color)
    def drawEdit(self, rect, text, hasFocus, caretPos, selectPos)
    def drawFrame(self, rect, title)
    def drawScrollButtonUp(self, rect)
    def drawScrollButtonDown(self, rect)
    def drawScrollBar(self, rect)
    def drawTabItem(self, rect, title, active)
    def drawTabHeader(self, rect)
    def drawMenuBar(self, rect)
    def drawMenuBarItem(self, rect, title, selected)
    def drawMenu(self, rect)
    def drawMenuItem(self, rect, title, selected, icon = None)
    def drawListBoxItem(self, rect, title, selected, color)
    def drawSplitter(self, rect)
    def drawToolTip(self, text, rect)
For example of how to create a new theme, see the differences between dataTheme in pyui.theme.py and theme2k in pyui.theme2k.py.
Changing the theme at run-time
If you wish to change the theme at runtime, all the existing windows must be redrawn to ensure they are switch to the new theme. To do this:
newTheme = pyui.theme2k.theme2k(pyui.desktop.getRenderer(), w, h)
pyui.desktop.getDesktop().theme = newTheme
for w in pyui.desktop.getDesktop().windows:
    w.setDirty()
This will iterate through all the existing windows and set them dirty.
(C) Sean Riley 2002